Description
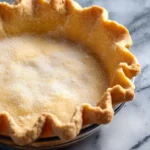
A gluten-free pie crust made with cassava flour, perfect for any pie filling.
Ingredients
Scale
- 1 3/4 cup cassava flour (210g)
- 1/2 cup arrowroot starch (65g)
- 1 1/2 teaspoon xanthan gum (optional – see notes)
- 1 teaspoon salt
- 2 eggs, whisked
- 1/3 cup vegetable shortening or lard, chilled and diced* (75g)
- 1/3 cup cold butter, diced (75g)
- 3–5 tablespoons ice cold water
Instructions
- Whisk cassava flour, arrowroot flour, xanthan gum and salt together in a large mixing bowl.
- Make a small well in the middle of the flour. Pour the whisked eggs in the well then stir into the flour.
- Add the chilled and diced shortening and butter to the flour mixture. Mix into the flour mixture with a couple of forks or pastry cutter a sandy kind of mixture.
- Add the ice cold water, 1 tablespoon at a time. Mix in between each addition of water. Keep adding water and mixing until the dough comes together.
- Divide dough in half (each half weighing about 310g). Form each half into disc shape. Wrap tightly in plastic wrap and refrigerate the dough for at least 20 minutes and up to 5 days.
- Lay out a large piece of parchment paper or silicon baking mat. Lightly dust your hands, the work surface and rolling pin with flour.
- Place one half of the dough in the middle and begin rolling it out. Sprinkle over a little more flour as you go if it starts to stick to the rolling pin. Every so often flip the dough over to make sure it’s not sticking to the paper. Roll into a circular shape that is at least 12 inches in diameter to easily fit a 9-inch pie plate. It will be about 1/8 inch/ a little over 3 mm thick.
- Use the parchment paper to transfer your dough to the pie dish. Slip one hand under paper to gently lift and flip the dough over into the pan.
- Peel back the paper and sooth over any cracks or breaking points in the dough. Use the dough hanging over the edges of the pie dish to cover up the holes in the middle. Crimp the edges of the dough as you like.
- Proceed with the pie according to your recipes instructions.
Notes
- The xanthan gum is optional but recommended for better texture.
- You can refrigerate the dough for up to 5 days or freeze it for longer storage.
- Prep Time: 20 minutes
- Cook Time: 0 minutes
- Category: Dessert
- Method: Baking
- Cuisine: American
Nutrition
- Serving Size: 1 slice
- Calories: 200
- Sugar: 1g
- Sodium: 200mg
- Fat: 15g
- Saturated Fat: 7g
- Unsaturated Fat: 5g
- Trans Fat: 0g
- Carbohydrates: 22g
- Fiber: 2g
- Protein: 2g
- Cholesterol: 70mg