Follow Me On Social Media!
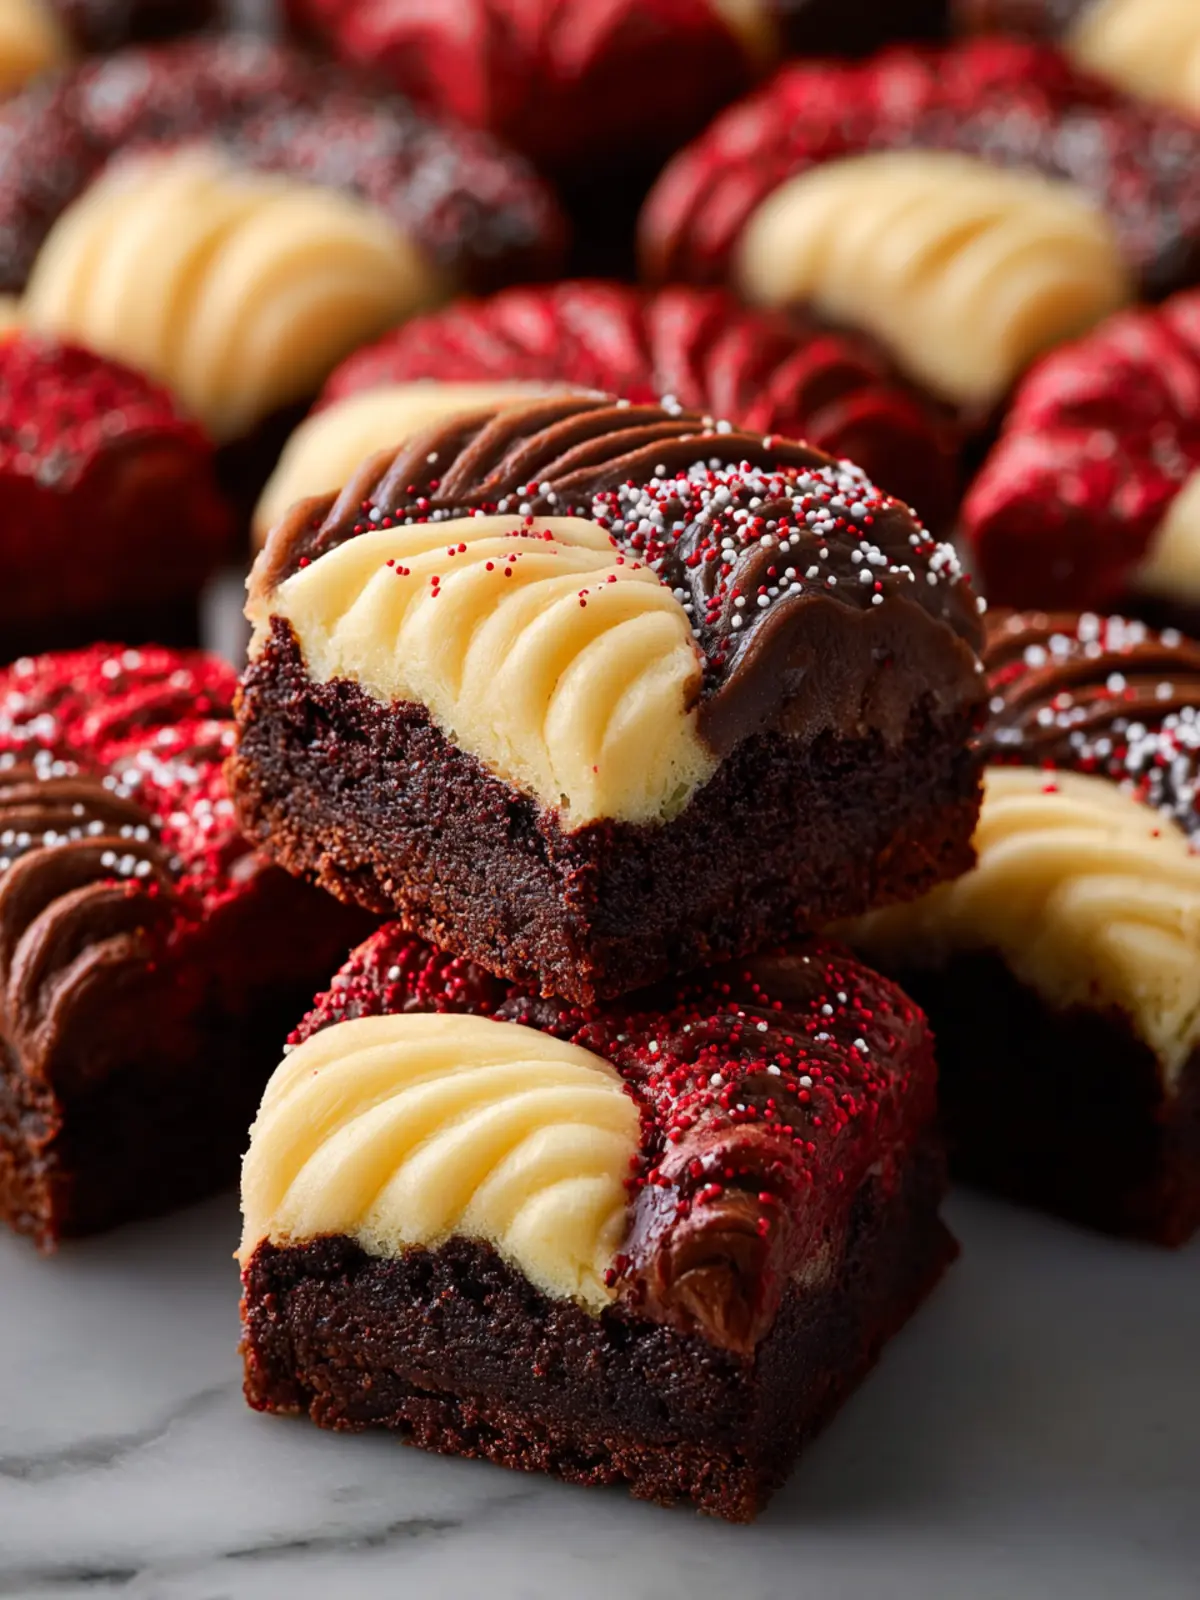
Red Velvet Cheesecake Brownies: Irresistibly Decadent Delight
Introduction to Red Velvet Cheesecake Brownies
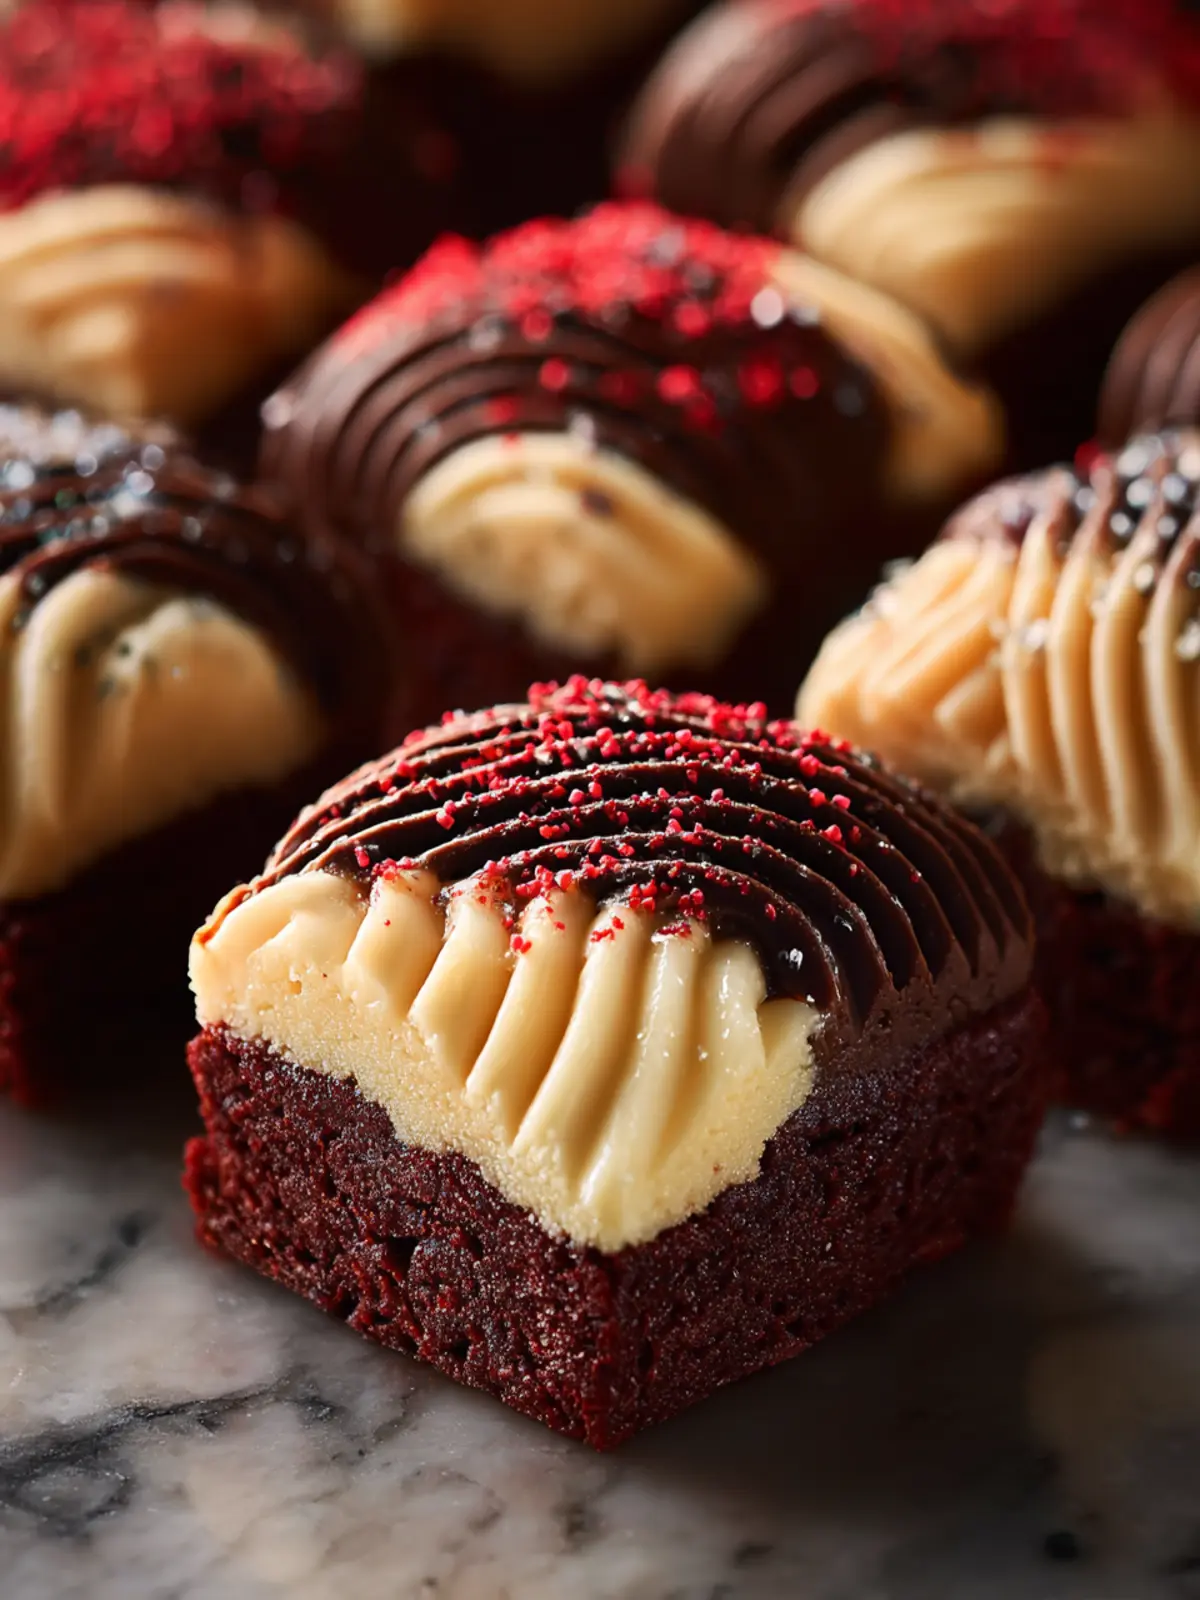
When you think about indulgent desserts, red velvet cheesecake brownies effortlessly come to mind, blending the velvety elegance of red velvet cake with the creamy richness of classic cheesecake. Imagine biting into a moist, chocolatey brownie layered with a luscious cheesecake swirl that tantalizes your taste buds at every turn. This delightful dessert doesn’t just look stunning with its deep crimson hue; it offers a concert of flavors that’s hard to resist.
What makes Red Velvet Cheesecake Brownies so special?
So, what’s the magic behind red velvet cheesecake brownies? Beyond their eye-catching appearance, these brownies combine the best of two worlds: the deep, rich flavor profile of red velvet and the creamy lightness of cheesecake. It’s a dessert that not only satisfies your sweet tooth but also elevates your baking skills—perfect for impressing friends at a gathering or treating yourself after a long week.
-
Visual Appeal: The striking red color marbled with the creamy cheesecake mix makes these brownies a show-stopper, fitting for any occasion. Whether it’s a holiday gathering or a simple family dinner, they’re sure to draw compliments and excitement.
-
Flavor Fusion: The subtle hint of cocoa in the red velvet pairs beautifully with the tangy cream cheese, creating a layered flavor experience. Each bite is an adventure that brings a hint of nostalgia for those classic bakeries and childhood dessert memories.
-
Texture Contrast: Imagine soft and chewy brownie goodness contrasted with a smooth and creamy cheesecake topping. The mixture of textures is nothing short of delightful, making each brownie a unique experience.
Oh, and let’s not forget about the versatility of this dessert! You can serve them as festive treats for occasions or simply as a cozy nighttime snack with a scoop of vanilla ice cream. Once you discover how easy these red velvet cheesecake brownies are to whip up, you might find yourself making them on repeat! If your sweet cravings are calling, look no further; let’s dive into the recipe and create some baked magic together!
Key Ingredients for Red Velvet Cheesecake Brownies
Creating red velvet cheesecake brownies is about blending rich flavors and textures, and each ingredient plays a pivotal role in making this decadent treat a masterpiece.
Red Velvet Cake Mix
Using a high-quality red velvet cake mix serves as the base for these brownies. It gives that signature maroon hue and rich, cocoa-infused flavor that makes them so special. If you prefer a homemade version, combining cocoa powder with flour can work wonders too.
Cream Cheese
Infusing the cheesecake layer with cream cheese adds a tangy richness that perfectly complements the sweetness of the brownie base. It’s essential to let the cream cheese soften to room temperature for a smooth, creamy filling that spreads easily.
Granulated Sugar
Granulated sugar sweetens both the brownie mix and the cheesecake, ensuring the brownies are indulgent but not overwhelmingly sweet. Finding the right balance is key to a satisfying dessert experience.
Eggs
Eggs are crucial for binding the ingredients together while imparting moisture and structure to your red velvet cheesecake brownies. Make sure they are at room temperature for the best results.
Butter
Using melted butter in the brownie mixture enhances the depth of flavor and contributes to a fudgy texture. You could substitute with equal parts coconut oil for a dairy-free alternative.
By carefully selecting these key ingredients, you’re on track to making a dessert that will leave your friends and family asking for seconds!
Why You’ll Love Red Velvet Cheesecake Brownies
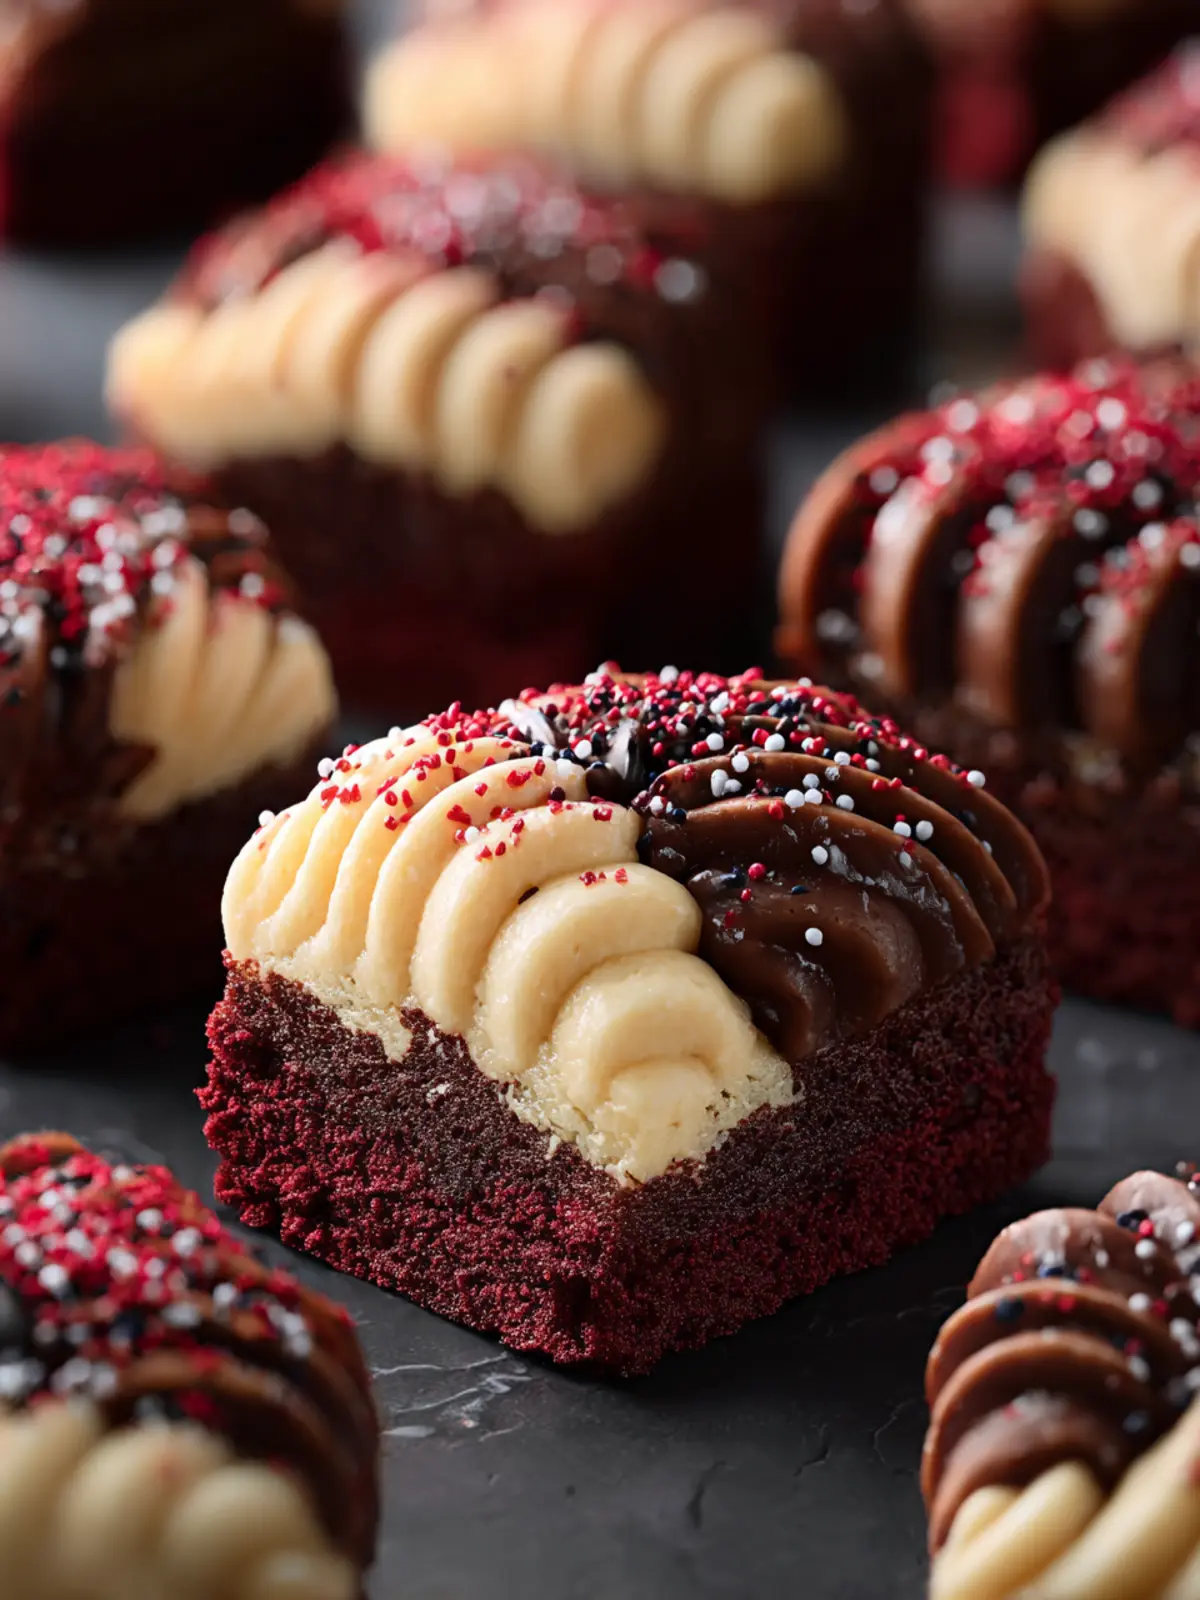
Discovering red velvet cheesecake brownies is like stumbling upon a hidden gem in the world of desserts. The moment you take your first bite, you’re greeted with a rich, velvety batter that elegantly intertwines with a smooth and luscious cheesecake layer. It’s an experience that goes beyond mere indulgence; it’s a delightful fusion of textures and flavors that make every occasion feel special.
Unforgettable Taste Experience
These brownies boast the classic, slightly tangy flavor of red velvet, perfectly balanced by the creamy sweetness of the cheesecake topping. This combination creates an enchanting taste that will leave you and your guests craving more.
- Visual Appeal: The striking red color against the creamy white layer not only dazzles the eyes but also sets the stage for an exciting dessert journey.
- Versatile Treat: Whether it’s a cozy night in or a celebratory gathering, these brownies fit perfectly into any situation, evoking smiles and compliments with every serving.
- Easy to Make: You don’t need to be a baking wizard to whip these up. The straightforward steps in the recipe make it easy to impress without the hassle.
So, treat yourself to the joy of red velvet cheesecake brownies, and watch as they steal the spotlight at your next gathering!
Variations on Red Velvet Cheesecake Brownies
Whoever thought red velvet cheesecake brownies could have even more flavor options? If you want to switch things up, there are plenty of delicious variations to explore that will keep your taste buds excited!
Cream Cheese Swirl
Elevate your brownies with a double layer of cream cheese. By adding an extra dollop of sweetened cream cheese to the top layer and swirling it through, you double the creaminess while keeping that tangy contrast of flavors intact. Who could resist?
Chocolate Chip Delight
For chocolate lovers, mixing in some semi-sweet chocolate chips will add richness to your red velvet cheesecake brownies. Sprinkle them into the batter or fold them into the cream cheese mixture before swirling. This little twist adds a delightful melty texture with every bite.
Nutty Crunch
If you’re a fan of crunch, consider adding chopped nuts like pecans or walnuts. They provide a lovely contrast to the soft texture of the brownies while enriching the overall flavor. Just fold them in gently; you want to keep that fudgy consistency intact.
Seasonal Flavors
Embrace the seasons by adding spices like cinnamon or nutmeg for a fall-inspired treat, or even a splash of peppermint extract during the holidays. A little zest from orange or lemon can also brighten the flavor and complement the cocoa beautifully.
Each of these variations offers a unique spin on your red velvet cheesecake brownies, bringing a fun new twist to a classic treat!
Cooking Tips and Notes for Red Velvet Cheesecake Brownies
Creating the perfect red velvet cheesecake brownies is as much about technique as it is about ingredients. If you’ve ever had that sinking feeling when your dessert doesn’t turn out quite right, you’re not alone. Here are some friendly pointers to help you achieve that velvety dream dessert.
Perfecting Your Chocolate Swirl
To get that beautiful marbled effect, don’t be afraid to get a little artistic. After pouring in the brownie batter, dollop spoonfuls of cheesecake mixture on top and use a knife or toothpick to swirl them together gently. Just remember, less is more. Too much swirling can turn your masterpiece into a muddled mess.
Ensuring Optimal Baking Time
Every oven is different. Start checking your red velvet cheesecake brownies about five minutes before the recommended baking time. They should be set around the edges but still slightly gooey in the middle for that perfect fudge-like texture. A toothpick inserted should come out with a few moist crumbs, but not wet batter.
Cooling for the Best Taste
Allow your brownies to cool completely in the pan before slicing. This might be the toughest part, but patience pays off! Cooling helps set the cheesecake layer, making your brownies easier to cut and serving each piece with that delightful cheesecake topping intact.
Storage Secrets for Freshness
Once cooled, store your red velvet cheesecake brownies in an airtight container. They can be kept in the fridge for up to a week. If you love your brownies even more chilled, try storing them in the freezer for a refreshing treat later—just remember to thaw for a few minutes before indulging!
With these tips, you’ll not only craft delicious red velvet cheesecake brownies but also impress friends and family with your baking finesse! Happy baking!
Serving Suggestions for Red Velvet Cheesecake Brownies
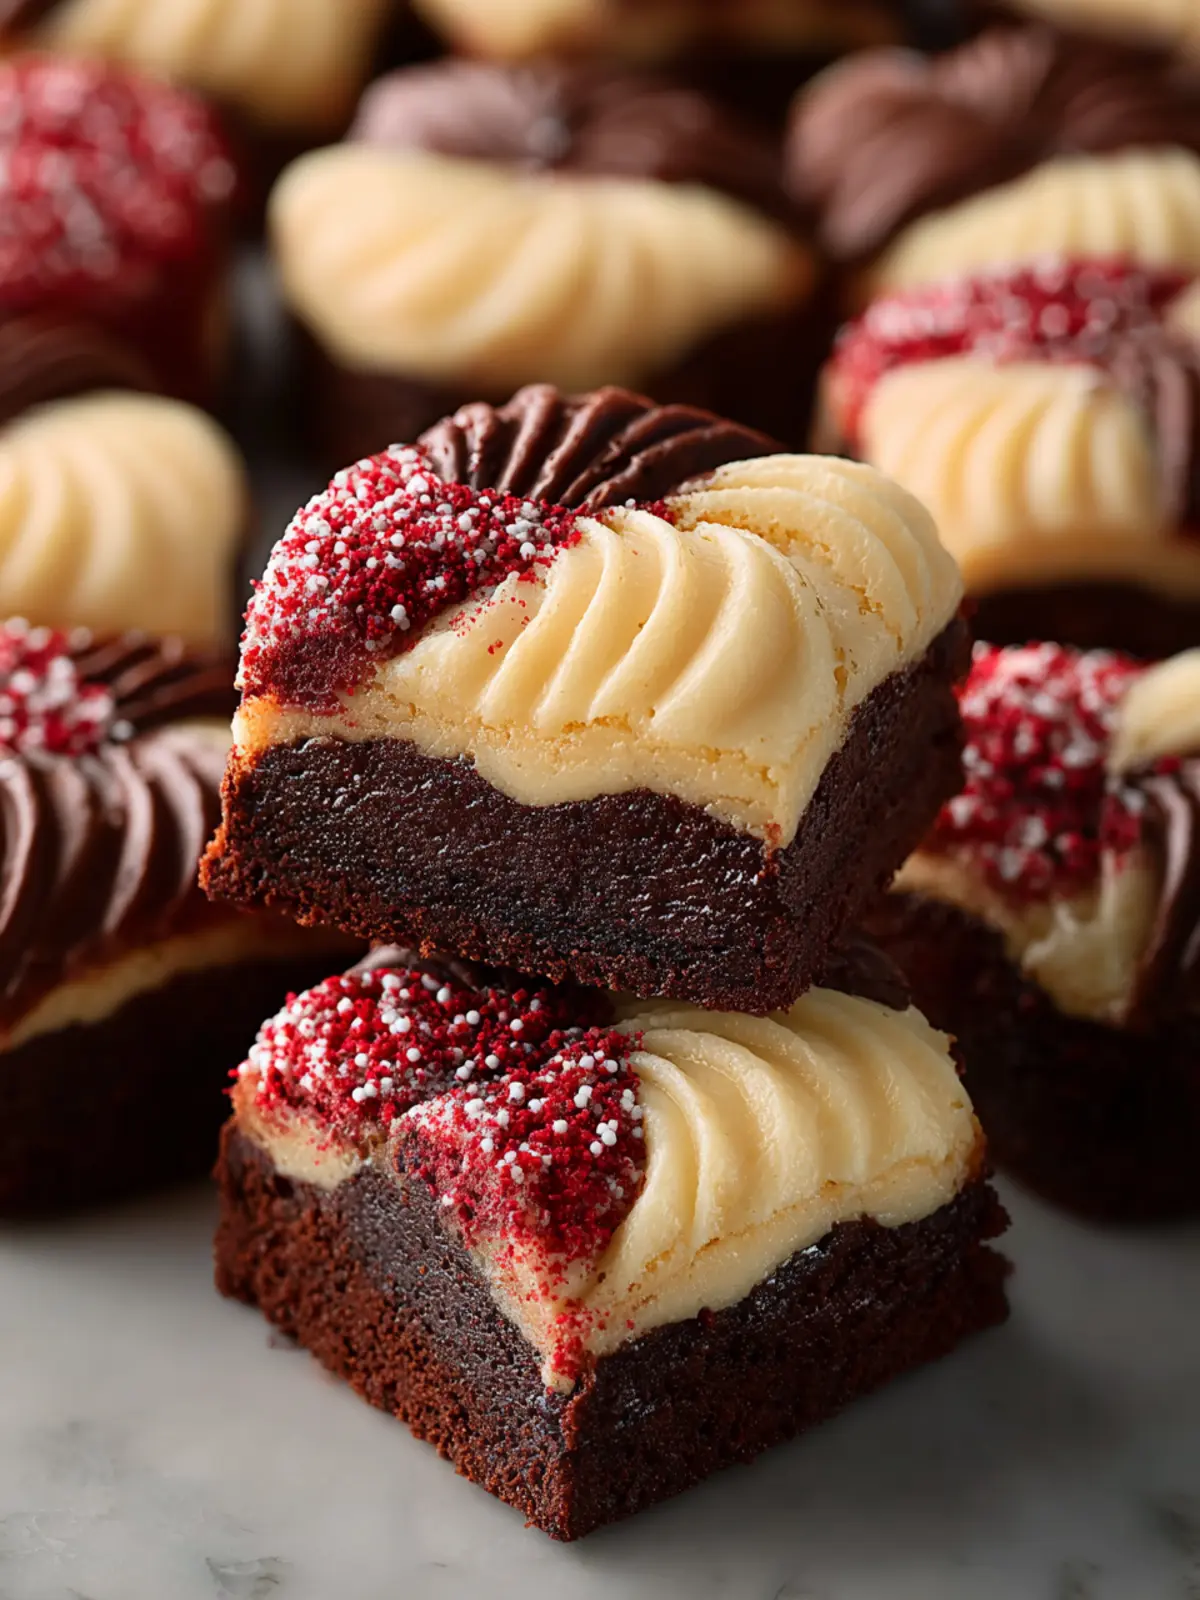
Bringing red velvet cheesecake brownies to the table calls for a touch of creativity and style. The rich, decadent layers of chocolatey goodness and tangy cream cheese make these brownies not just a dessert, but a delightful centerpiece for any gathering.
-
Serving Warm: For an indulgent experience, serve the brownies warm. A quick zap in the microwave for about 10-15 seconds will melt the cream cheese layer a bit, creating a luscious texture that pairs beautifully with a scoop of vanilla ice cream.
-
Garnish Options: Add fresh raspberries or strawberries on the side. Their tartness balances the sweetness of the brownies and enhances their visual appeal.
-
Elegant Plating: Drizzle some chocolate or caramel sauce artistically across the plate before arranging the brownies. This not only elevates the presentation but also adds an extra layer of flavor that leaves guests reaching for seconds.
-
Coffee Pairing: A strong cup of coffee or a glass of milk makes the perfect accompaniment, enhancing the rich flavors of your red velvet cheesecake brownies and making every bite memorable.
Experiment with these suggestions to make your dessert truly unforgettable!
Time Breakdown for Red Velvet Cheesecake Brownies
Creating the perfect red velvet cheesecake brownies is a delightful experience that combines the rich hues of red velvet with creamy cheesecake. Understanding the timing is essential to ensure that these beauties turn out just right. Here’s a quick guide to help you navigate the process.
Preparation Time
Getting everything ready for your red velvet cheesecake brownies takes about 20 minutes. During this time, you’ll gather your ingredients, prep your baking dish, and mix your brownie and cheesecake batters.
Baking Time
Once everything is prepped, pop the brownies into the oven for approximately 30-35 minutes. You’ll know they are done when a toothpick inserted into the center comes out with a few moist crumbs.
Total Time
From start to finish, expect to spend around 1 hour and 15 minutes on your red velvet cheesecake brownies. This includes preparation and baking time, making it a perfect recipe for a delightful afternoon treat. Enjoy the process and the delicious results!
Nutritional Facts for Red Velvet Cheesecake Brownies
When indulgence meets nutrition, we get the red velvet cheesecake brownies that you crave. These brownies are not just a feast for the eyes but also present a balance of flavors and textures that you won’t want to miss out on.
Calories
Each serving of these delightful brownies packs approximately 250 calories. While they are a treat, it’s always good to be mindful of serving size to enjoy your dessert without compromise.
Protein
You’ll discover about 4 grams of protein in each serving. While that’s not a hefty amount, the protein from the cream cheese in the cheesecake layer adds a touch of richness to your delightful experience.
Sugar
With around 22 grams of sugar per brownie, these red velvet cheesecake brownies offer a sweet bite. If you’re looking to satisfy your sweet tooth, this treat certainly hits the mark while still balancing your day!
FAQs about Red Velvet Cheesecake Brownies
Baking red velvet cheesecake brownies can be such a rewarding experience, and naturally, questions might pop up during the process or after you’ve taken that first decadent bite. Here are some common queries that can help you navigate your baking adventure and get the most out of your delicious treats.
Can I make these brownies ahead of time?
Absolutely! One of the best parts about red velvet cheesecake brownies is that they store well. You can prepare the batter and bake the brownies a day ahead of serving. Just make sure to let them cool completely before covering them with plastic wrap or transferring them to an airtight container. This way, they’ll be ready for your next gathering or a sweet late-night snack.
How do I store leftover brownies?
If you have any brownies left (which is often unlikely!), store them in an airtight container at room temperature for up to three days. For longer storage, you can refrigerate them for about a week. If you want to keep them even longer, consider freezing individual pieces in plastic wrap and then placing them in a freezer bag. Just remember to let them come to room temperature before enjoying!
What’s the best way to cut brownies?
Cutting red velvet cheesecake brownies can be an art form! To ensure clean cuts and avoid making a mess, use a sharp knife and warm it under hot water for a moment before slicing. Wipe the knife with a paper towel between cuts. This technique helps maintain the beautiful layers of cheesecake and brownie, making your presentation as stunning as the flavor.
These tips should great help you enjoy your red velvet cheesecake brownies without a hitch!
Conclusion on Red Velvet Cheesecake Brownies
In the world of decadent desserts, red velvet cheesecake brownies stand out as a delightful treat that combines rich flavors and stunning visuals. These brownies are more than just a dessert; they tell a story of sweet indulgence, perfect for sharing with friends during a cozy gathering or for celebrating special occasions. The vibrant red hue and luscious cream cheese swirl transform every bite into a joyful experience. Whether you’re a seasoned baker or trying something new, these brownies will undoubtedly impress. So, roll up your sleeves and dive into the world of baking with this irresistible recipe—you won’t regret it!
Print
Chocolate Swirl Cookies
- Total Time: 27 minutes
- Yield: 24 cookies 1x
- Diet: Vegetarian
Description
Delicious chocolate swirl cookies perfect for any occasion!
Ingredients
Scale
- 1 cup unsalted butter (softened)
- 3/4 cup granulated sugar
- 1 large egg yolk
- 2 teaspoons vanilla extract
- 1/4 teaspoon salt
- 2 cups plus 2 tablespoons all-purpose flour (265g total)
- 1 cup dark chocolate chips
- 1/2 teaspoon vegetable shortening
- Nonpareil sprinkles (optional)
Instructions
- Preheat oven to 375F (190C).
- In a large bowl (or, preferably, in the bowl of a stand mixer), combine butter and sugar and beat together with an electric mixer until creamy and very well-combined (several minutes on high speed).
- Add egg yolk, vanilla extract, and salt and beat well. Pause to scrape the sides and bottom of the bowl to ensure that all ingredients are well incorporated.
- With mixer on low speed, gradually add flour until the flour is completely combined. Increase speed to high and continue to stir very well until dough is smooth (several minutes longer, if dough is not mixed enough it will not pipe easily for you). Again, make sure you pause occasionally to scrape the sides and bottom of the bowl.
- Fit a large piping bag with Ateco 827 piping tip and portion half of the cookie dough into the bag.
- Pipe cookies into swirl shapes on an unlined, ungreased cookie sheet.
- Transfer to preheated oven and bake for 10-12 minutes or until edges of cookies are just beginning to turn golden brown.
- Allow cookies to cool for 10 minutes on cookie sheet before transferring to cooling rack to cool completely.
- Do not pipe cookie dough onto a hot or warm cookie sheet.
- Once cookies have cooled completely, dip in chocolate (if desired).
- Combine chocolate chips and shortening in a small bowl. Heat in the microwave in 20 second increments, stirring well in between, until chocolate is completely melted and smooth.
- Dip cookies in chocolate and transfer to a wax paper lined cookie sheet. Decorate with nonpareils or other sprinkles, if desired.
- Allow chocolate to harden before enjoying. You can speed up this process by placing the cookies in the refrigerator for about 15 minutes.
Notes
- Make sure to scrape the bowl often for even mixing.
- Chilling the cookies can help set the chocolate faster.
- Prep Time: 15 minutes
- Cook Time: 12 minutes
- Category: Dessert
- Method: Baking
- Cuisine: American
Nutrition
- Serving Size: 1 cookie
- Calories: 150
- Sugar: 10g
- Sodium: 50mg
- Fat: 8g
- Saturated Fat: 5g
- Unsaturated Fat: 3g
- Trans Fat: 0g
- Carbohydrates: 18g
- Fiber: 1g
- Protein: 2g
- Cholesterol: 20mg